Bin Composting
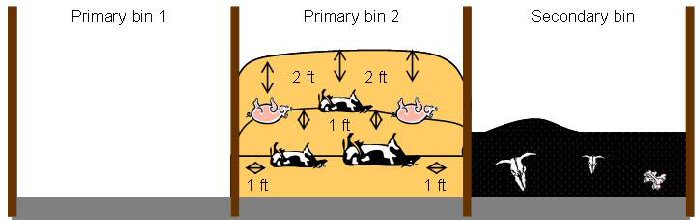
There are many different types of composting bins that can be used for carcass composting. They may be constructed with wood, concrete or straw bales. Hoop structures and altered machine sheds can also be used for bin composting. A bin system usually consists of at least two primary bins and one secondary bin, a concrete pad with a 4-6 inch curb to prevent leaching, and a roofing system to help control moisture levels. The width of each bin is wide enough to allow access with a front-end or skid-steer loader and are usually filled up to six feet.
Step 1
Place 2 ft (60 cm) layer of co-compost material on the floor of the primary bin 1.

Step 2
Lay the carcass in the centre of the base on its back or side.
Step 3
For ruminants larger than 300 lbs (136 kg), it is recommended to cut open the thoracic, abdominal cavities, viscera, as well as, slice large muscle mass to accelerate the compost process and prevent possible explosion of the intestinal cavities. For non-ruminant animals, no lacerations are required. Before the animal is covered, wet the animal hair or fur with water; this provides good carcass to co-compost contact.
Step 4
Cover the entire carcass with at least 2 ft (60 cm) of co-compost material. The 2 ft (60 cm) layer of material will act as a biofilter to reduce unwanted odours. For more than one animal mortality, make sure there is at least 1 ft (30 cm) of co-compost between the carcasses.
Step 5
When adding more carcasses, skim the top layer down to 1 ft (30 cm).
Step 6
Place the carcasses on top of the pile ensuring that the carcasses are not touching. It is recommended to leave approximately 1 ft (30 cm) of co-compost between mortalities. Once primary bin 1 is full, you are in the primary stage. In this stage, the temperature should increase to 40-65°C.
Step 7
Once primary bin 1 is full, start filling primary bin 2 following steps 1-7 above.
Step 8
Once the temperature in primary bin 1 stays above 40°C for at least seven consecutive days and then continues to drop, the pile is ready to be emptied into the secondary bin (approximately 3 months). By this time the compost pile should contain bones and minimal flesh.
Step 9
Once the pile is turned, you are in the secondary stage. The temperatures inside the pile should rise again to 40-65°C (104-109°F). Piles may be turned regularly once a week from this point on.
Step 10
Inspect the pile (after approximately 3 months), the contents from primary bin 2 should be turned into the secondary bin (see diagram A). If there are still signs of flesh in the contents in the secondary bin (remnants from primary bin 1), mix the contents from primary bin 2 with the contents in the secondary bin (see diagram B).
Inspect the pile in the secondary bin. If there are no signs of flesh and very little unwanted odour, cure the pile for at least 21 days. Bones should be very brittle at this stage. Larger bones may be sieved out and placed in a new compost pile as inoculants.
Compost is finished when:
- Compost has been cured for > 21 days and shows at least a 60% reduction in weight
- Compost pile temperature should be less than 8°C higher than ambient temperature.
- Original feedstocks are difficult to identify.
- Fine texture, dark colour, “earthy” aroma are often present.
The Finished Product